5 Fun & Safe Science Experiments You Can Do at Home in Dubai
Children are natural-born scientists. They are endlessly curious, constantly asking “why?”, and love to learn by doing. One of the best ways to nurture this innate curiosity is by turning your home into a mini science lab!
You don’t need expensive equipment or a PhD in physics to create moments of scientific wonder. With just a few common household items you can find in any Dubai supermarket, you can spark your child’s imagination and help them discover the magic behind the world around them.
This guide provides five of our favorite fun, safe, and super easy science experiments, perfect for a primary-aged child. Let’s get exploring!
A Quick Word: Safety First!
Before we begin, let’s set up our lab rules. The most important part of any experiment is doing it safely.
Adult Supervision is a Must: An adult should always be present to supervise these experiments.
Protect Your Space: Lay down some old newspaper or a plastic tablecloth to protect your surfaces from any spills.
Handle with Care: Never taste or eat any of your experiments, even if they use kitchen ingredients.
1. The Magical Color-Changing Milk
This experiment is visually stunning and a fantastic introduction to the science of surfaces.
What You’ll Need:
A shallow dish or plate
Full-fat milk
Food coloring (at least 3 different colors)
Cotton buds (Q-tips)
Dish soap
Step-by-Step:
Pour enough milk into the dish to completely cover the bottom.
Carefully add a few drops of each food coloring onto the surface of the milk. Place them near the center but don’t let them mix.
Take a clean cotton bud and dip it into the center of the milk. What happens? (Nothing yet!)
Now, put a drop of dish soap onto the other end of the cotton bud.
Touch the soapy end of the cotton bud to the surface of the milk right in the middle of the colors and hold it there for 10-15 seconds.
Watch the magic happen! The colors will burst and swirl around the plate in a beautiful display.
The Science Behind It: Milk is mostly water, but it also contains fats and proteins. The dish soap is a “surfactant,” meaning it weakens the surface tension of the milk. The soap molecules race around trying to connect with the fat molecules in the milk, and the food coloring gets pushed around by all this invisible movement, creating the beautiful color explosion.
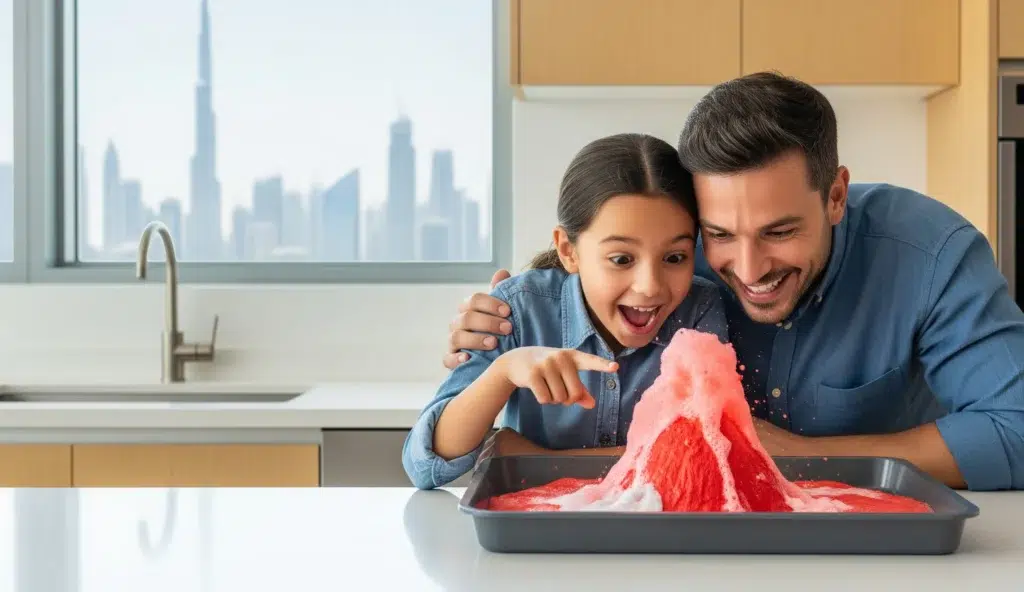
2. The Classic DIY Volcano
No home science list is complete without an erupting volcano! This is a classic introduction to chemical reactions.
What You’ll Need:
A small plastic bottle
A tray or baking dish to contain the “lava”
Warm water
A few drops of red food coloring
A good squirt of dish soap
2 tablespoons of baking soda
Vinegar
Step-by-Step:
Place the plastic bottle in the center of your tray.
Fill the bottle about halfway with warm water.
Add the dish soap and red food coloring to the water.
Add the baking soda and give the bottle a gentle swirl to mix it in.
Now for the fun part! Quickly pour about a quarter cup of vinegar into the bottle and step back.
Watch your volcano erupt with bubbly red “lava”!
The Science Behind It: You’ve just witnessed an acid-base reaction. The baking soda (sodium bicarbonate) is a base, and the vinegar (acetic acid) is an acid. When they mix, they react to create carbon dioxide gas. This gas builds up pressure inside the bottle until it has nowhere to go but up and out, carrying the soapy, colored water with it in a fizzy eruption.
3. The Instant Ice Tower
This experiment feels like a real superpower and is perfect for a hot Dubai day. It teaches kids about supercooling and crystallization.
What You’ll Need:
An unopened bottle of purified drinking water
A freezer
A small bowl
A few ice cubes
Step-by-Step:
Lay the unopened bottle of purified water on its side in the freezer. It is crucial that it is purified water.
Leave it in the freezer for about 2 hours and 45 minutes. The timing is key—you want the water to be “supercooled” below its freezing point, but not yet frozen solid.
Place one or two ice cubes in your small bowl.
Very, very carefully take the bottle of water out of the freezer. Do not shake it!
Slowly and gently, begin to pour the supercooled water onto the ice cubes.
Be amazed as a tower of ice instantly grows upwards as you pour!
The Science Behind It: Freezing requires a “nucleation site”—a tiny crystal or impurity for the ice to start forming on. Because purified water has no impurities, it can get colder than 0°C without turning to ice (this is called supercooling). The ice cubes you pour the water onto act as the nucleation site, triggering a rapid chain reaction that causes all the supercooled water to crystallize into ice almost instantly.
The level of precision and curiosity needed for an experiment like this often sparks a deeper interest. For a child who is truly fascinated by these principles, exploring them further with the one-on-one guidance of a primary science tutor can be a fantastic way to nurture their passion.
4. The DIY Lava Lamp
Create the groovy effect of a lava lamp using simple kitchen ingredients. This is a great lesson in density and chemical reactions.
What You’ll Need:
A tall, clear glass or plastic bottle
Water
Vegetable oil
Food coloring
A fizzy tablet (like an Alka-Seltzer or Vitamin C tablet)
Step-by-Step:
Fill the glass about one-quarter full with water.
Add several drops of your favorite food coloring.
Fill the rest of the glass almost to the top with vegetable oil. Notice how the oil and water don’t mix!
Break the fizzy tablet into a few smaller pieces.
Drop one piece of the tablet into the glass and watch your lava lamp come to life!
The Science Behind It: This experiment demonstrates two scientific principles. First, density: the oil is less dense than the water, so it floats on top. The food coloring only mixes with the water. Second, a chemical reaction: the fizzy tablet reacts with the water to produce bubbles of carbon dioxide gas. These bubbles attach themselves to the blobs of colored water and carry them to the top. When the bubbles pop, the heavy water blobs sink back down, creating the classic lava lamp effect.
5. The Floating Egg
This simple experiment is a mind-bending introduction to the concept of density that will surprise the whole family.
What You’ll Need:
Two tall glasses
Water
Salt
Two raw eggs
Step-by-Step:
Fill both glasses about two-thirds full with plain tap water.
Gently place one egg into the first glass. Observe how it sinks straight to the bottom.
In the second glass, add about 3-4 tablespoons of salt and stir until it dissolves completely. You are creating salt water.
Now, gently place the second egg into the salt water.
Watch in amazement as the egg floats!
The Science Behind It: The ability of an object to float depends on its density compared to the density of the liquid it’s in. A regular egg is denser than tap water, so it sinks. By dissolving a lot of salt in the water, you increase the water’s density. Eventually, the salt water becomes denser than the egg, causing the egg to float! This is the same reason it’s so easy to float in the very salty water of the Dead Sea or even in the Arabian Gulf.
A skilled primary school tutor often uses simple, powerful demonstrations like these to make abstract scientific concepts tangible and exciting for children.
Conclusion: Keep the Curiosity Bubbling
The most important outcome of any of these experiments isn’t a perfect volcanic eruption or a flawless ice tower. It’s the look of wonder in your child’s eyes. It’s the moment they ask, “Why did that happen?”
Encourage that curiosity. Let them get a little messy. The goal is to show them that science isn’t just a subject in a textbook; it’s a thrilling, hands-on way to explore and understand the world.
If these experiments ignite a real spark of passion in your child, and you want to provide them with the support to explore these concepts more deeply, learn more about how our expert primary tutors can nurture their love for science.